My experiments with baking a basic whole wheat bread (Recipe inside)
At the beginning of 2013, I asked for your feedback on my Facebook Page on the kind of things you'd like to see on the blog this year and that I'll try and incorporate some of your recipe requests. And the one thing that was a popular demand was a healthy loaf of bread. So here's my attempt to share
Ingredients
- 2 3/4 cups Atta (whole wheat flour)
- 2 3/4 Cups Maida (all purpose flour)
- 2 tbsps flaxseed powder (optional)
- 1 tbsp salt
- 1 cup water lukewarm (very slightly warm) plus some more
- 2 tsps yeast active dry yeast instant or active dry
- 1/3 cup Jaggery Honey Liquid or
- 2 tbsps vegetable oil ghee live oil / / melted
- 1 cup milk lukewarm
Instructions
- THE FIRST STAGE - ROUGH DOUGH
- In a small bowl, sprinkle yeast over 1 cup lukewarm water-stir with a spoon, cover and keep aside for 5 minutes, until it becomes slightly frothy.
- In a large bowl, add the flours, flaxseed meal and salt, stir with a fork and keep aside.
- In another bowl, mix all the liquids- liquid jaggery/honey, milk and oil with a fork and keep aside.
- Once the yeast gets frothy, make the well in the flour and add the yeast-water and other liquids. Stir with a wooden spoon until all the liquids are absorbed by the flour and it sort of comes together.
- Remove this onto a clean counter top or working surface and gently knead, adding up to 1/4 cup more water if this dough is too dry. Knead for 2-3 minutes until it all comes together to a rough ball.
- Cover this with a big bowl and let it rest for 20 minutes. This allows for the liquids to be well absorbed by the flour particles yielding a softer loaf at the end.
- THE SECOND STAGE - KNEADING PROVING
- Once the dough has rested for 20 minutes, you'll find this easier to handle. It has to be kneaded (here, you could use a Kitchen Aid or Food Processor) for 10-12 minutes. By kneading I mean-pushing the dough away from you and folding it back on itself towards you.
- Repeat this process for at least 10 minutes, you'll the the dough getting progressively more elastic and soft. Once this is done, shape into a ball. Grease a huge bowl with oil, place the ball in this - cover with a fitting lid + tea towel and keep in the warmest area of your kitchen.
- You need to give the dough 1-2 hours for it to double in size and this totally depends on the weather conditions, which is why I cannot give you an exact time.
- If you wish you could keep the dough ball in a plastic transparent box, marking the level with a marker and then marking the level where you expect the doubled dough to reach, so you know that it has indeed doubled in volume.
- THE THIRD STAGE - MINI REST
- Once the dough has doubled, with a sharp knife divide it into two equal parts. Do NOT be rough with this and punch any air out. Gently shape each half into a ball and keep aside to rest for 10 minutes. This will make the final shaping easier.
- THE FOURTH STAGE - SHAPING LOAVES
- After 10 minute rest in the previous stage, follow the shaping procedure for each ball. Gently push out into a rectangle and go ahead with the step-by-step shaping instructions given here. I followed them to the tee each time and they worked perfectly.
- The end result should be a taut dome shaped top of each loaf. And I cannot emphasize enough to do the shaping with light, gentle hands so that you don't push any air out of the loaves.
- Place the shaped loaves into two 9x5 loaf tins. You could brush water on the loaves and sprinkle any whole grains or seeds on the top to give it a more gourmet look - for eg: whole oats, millets, sesame seeds, or sift 1 tsp of all purpose flour over the top.
- THE FIFTH STAGE - PROVING THE LOAVES
- Cover the tins with a tea towel and keep in a warm place until the dough rises to the edge of the tin. If you are impatient with this stage and put it into the oven prematurely (which I have done many times and suffered), you will not have well risen loaves, because this bread will only puff mildly in the oven, maximum rise is before it goes into the oven.
- This takes around 40 mins-1 hour, like I said, do not rush this stage. The middle of this stage is when you turn on the oven to preheat at 220 Celsius / 450 F and let the oven heat at this temp until the loaves rise outside to final level.
- THE SIXTH STAGE - BAKING THE LOAVES
- When the loaves have risen to just above the tins, brush them with some water. Using a sharp bread knife, make an incision along the length of the loaf. This not only makes the bread look good, but also helps it rise well.
- Reduce the oven temperature to 190 Celsius / 375 F and bake for 30-35 minutes, until the top is nice and golden brown.
- THE SEVENTH STAGE - COOLING
- Turn out the loaves from the tins. If you have greased the tins well, you wont have problems with this. Turn them upside down on a cooling rack and keep them covered with a breathable cloth like a muslin or so.
- You could leave them like this overnight or at least aim for an hour or so. During this stage, the bread continues to cook inside and it becomes easier to slice the following morning.
- If you try to slice the bread as soon as it is out of the oven, consider all your effort wasted, because the inside of the loaf WILL be wet and you will be disappointed with the result.
- Loaves HAVE to be cooled fully before trying to slice them. If you want to experience the joy of breaking into warm bread just out of the oven, reserve it for the small dinner rolls.
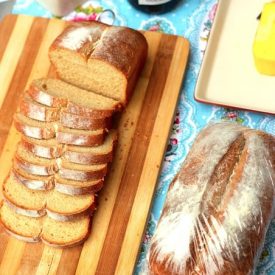
- THE EIGHTH STAGE - SLICING
- You've been patient - allowed the loaf to cool overnight. You will now be rewarded with sweet smelling, delicious bread slices for breakfast. Place the bread on a chopping board and with a sharp bread knife, slice it as thick or thin as you want.
Notes
Tips
1. I get started with the process at around 5/6 pm in the evening it gets baked by 9/10 pm or so, then let it cool overnight before slicing them in the morning. This process works well for me.
The original recipe says 8-10 mins of kneading in food processor (second stage), so make sure you knead at least for 10-15 mins when you are kneading manually. And following the push away-bring back technique for kneading.
If you don't have loaf tins, looks for bread shaping instructions that show you how to shape a free form loaf like focaccia or a dome shaped loaf. The proving and baking times have to be adjusted accordingly.
Just make sure that during the final proving, the shaped dough rises really well before putting into the oven.
Don't be afraid to make two loaves at one go, unless of course your oven will only take one tin at a time, in which case, halve all the ingredients and proceed accordingly. Do note that proving times may be less after the second stage.
I buy liquid jaggery from here (Bangalore) but you can mix some crushed jaggery to water, let it liquify on low heat and keep aside to use in recipe or use honey instead.
This provides a mild natural sweetness to the loaf and also the brilliant colour without using any additives or artificial colouring agents.
Lastly, bread making is an exercise in patience. You have to allow the bread to pass through each stage and it depends on a lot of factors. You cannot rush through. You may think- WHOA this takes 3-4 hours, but most of it is inactive time, it only requires your passing attention for a few minutes at a time.
It's good to keep a little notepad or keep track of the times on your phone, so you don't miss the time windows for kneading, resting, proving etc. A bit of precision and a lot of patience goes a long way in baking that perfect loaf of bread.
Don't let the number of steps or the huge number of words written to explain the process overwhelm you. It's quite simple actually. Try it and let me know how it turned out!.